If you're diving into drone photography, having the right gear can really elevate your shots. It’s not just about the drone itself; there are a few other essentials that can help you capture stunning images and videos. Let's break down some must-have gear that’ll take your drone photography game to the next level.
Extra Batteries
No one wants to cut a flight short because of a dead battery! Extra batteries are a game changer. They keep you in the air longer, letting you explore more and get that perfect shot. Look for high-capacity batteries that offer longer flight times.
ND Filters
Neutral density (ND) filters are pretty crucial if you want to tackle various lighting conditions. They limit the amount of light that enters the lens, which helps you avoid overexposed images, especially during bright sunny days. This tool is essential for getting those smooth, cinematic shots and helps you achieve perfect shutter speeds.
Landing Pad
A landing pad is a simple but super helpful tool. It gives you a clean, dedicated space to launch and land your drone, away from dirt and debris. Some models also make it easier to spot your drone when you're in a wide-open area. Plus, it can protect your drone’s sensors from dust and scratches.
Quality Memory Cards
The last thing you want is to run out of storage while you're out capturing incredible shots. Investing in high-speed memory cards is essential. Look for cards with fast write speeds so you can shoot high-resolution images and 4K videos without any hiccups. With the right memory card, you'll be all set to capture stunning shots with confidence.
Understanding Drone Settings for Better Photos
When it comes to drone photography, getting the right settings can make all the difference. Drones come with a bunch of options that might seem a bit overwhelming at first. But once you understand the basics, you can step up your game and capture some truly stunning shots. Here are a few key settings to consider.
First up is the camera resolution. Most drones let you adjust the image quality. If you're planning to print your photos or crop them for better framing later, go for the highest resolution available. It’s better to have too much detail than not enough. Keeping your photos in RAW format is also a great idea. RAW files carry more information, which means more flexibility when you edit your pictures.
Next, let’s talk about shutter speed. This setting controls how long your camera’s shutter stays open. A faster shutter speed is great for capturing moving subjects, while a slower speed can add some beautiful motion blur. A good rule of thumb is to set your shutter speed to at least double your frame rate. So, if you're shooting video at 30 frames per second, set your shutter speed to 1/60th of a second.
Don’t forget about ISO. This setting controls how sensitive your camera is to light. In bright daylight, use a lower ISO to ensure your shots are crisp and clear. If you're shooting in low light, increase the ISO to avoid dark, grainy photos. Just remember that higher ISO can introduce noise, so find a balance that works for your situation.
Lastly, keep an eye on white balance. This setting adjusts for different lighting conditions. If you're shooting during sunrise or sunset, set it to ‘Cloudy’ for warmer tones. In bright sunlight, ‘Daylight’ will keep your colors looking true. Understanding these settings is a big part of mastering drone photography tips. Play around with them, and you'll see your photos improve in no time!
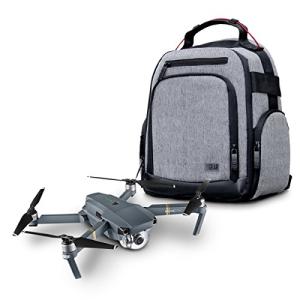
USA Gear Drone Backpack - Fits DJI Mavic & More
The perfect companion for your drone adventures, keeping your gear safe and organized wherever you go
Product information
$49.99
Product Review Score
4.36 out of 5 stars
53 reviewsProduct links
Framing Your Shot Like a Pro
When it comes to drone photography tips, framing your shot can make all the difference. Think of it as composing a beautiful picture with all the elements you want in focus. You have some cool tools at your disposal, like the drone's camera features and its ability to hover, which really help you nail the perfect frame.
Start by considering the rule of thirds. Picture your shot divided into nine squares, like a tic-tac-toe grid. Place the main subject of your photo along those lines or at the intersections. This little tweak can bring a nice balance to your shot and keep the viewer's eye right where you want it.
Don’t forget about perspective. Experiment with different angles—get low to the ground, fly higher, or even try a diagonal approach. Changing up your perspective can add depth and interest to your photos. You’d be surprised how shifting your drone a few feet can transform an ordinary scene into something striking.
Lighting is key in photography, and drone shots are no exception. Early mornings and late afternoons, when the sun is lower in the sky, give you that dreamy golden hour glow. Shadows and highlights can create drama in your shots, enhancing textures and colors. Take advantage of these times for breathtaking results.
Lastly, remember to keep it simple. Sometimes the most stunning images come from uncluttered backgrounds and clear focal points. Don’t overload your shot with too much going on. Stick to your main subject and let it shine. Combining all these ideas will elevate your photos, and soon you'll be on your way to mastering drone photography tips like a pro!

Sharper Image LED Stunt Drone with Remote Control
Experience thrilling aerial acrobatics with this easy-to-use stunt drone that lights up the sky
Product information
Product Review Score
4.96 out of 5 stars
94 reviewsProduct links
Editing Tips to Enhance Your Images
Editing is where the magic happens in drone photography. It’s not just about snapping the perfect shot; it’s about enhancing your images to make them pop. Here are some handy editing tips that'll take your drone shots to the next level.
First off, don’t skip out on cropping. Sometimes, framing can be off, and a little cropping can help focus on what really matters in your shot. It’s an easy way to draw attention to your subject and remove distracting elements. Aim for a balanced composition, and don’t be afraid to experiment.
Next, play around with the brightness and contrast. If your photos look a bit flat, boosting the contrast can make your colors shout. Adjusting brightness can help bring out details in the shadows or highlights, giving your images a more dynamic feel. Just remember, subtlety is key—too much can make your images look unnatural.
Lastly, don’t forget about color correction. Sometimes your drone might pick up colors that don't reflect the scene accurately. Use editing software to adjust the saturation and temperature. A slight tweak can bring those vibrant blues and greens to life, making your landscape shots truly stunning. Keep these drone photography tips in mind and watch your images transform!